Needlework: |
|
Canvaswork - tent |
|
Pulled Thread (pdf) |
|
Goldwork Basics |
|
Surface Embroidery |
|
Smocking & Pleating (coming soon we hope) |
Clothing: |
Textiles & Thread: |
|
Lucet Basics - Square and Flat Braid |
|
Dyes: |
Cooking: |
Golden Poppy Competition & Entries: |
|
Tinctures: Dyes & Inks |
| Narrow Wares: Fingerloop Braiding (coming soon) |
By Sabrina de la Bere
[Download the pdf version]
The first question is -- what is a slate frame? A slate frame is a frame for holding the fabric with a sufficiently tight tension to enable needlework to be done cleanly and precisely. The tension on a slate frame when dressed keeps the fabric squared. The frames are designed to be used flat. From medieval times to modern times they can be seen used in professional needlework shops lying on frame holders or "saw horses". When the fabric is placed on the frame ("dressed") it is said to be "framed up".
Even today The Royal School of Needlework states "We generally recommend the use of a slate frame for a serious embroidery project as it keeps the work taut and helps to achieve a professional finish."
Most slate frames have 2 horizontal boards which may be roller bars, 2 side boards which are sometimes called slates or stretcher bars, and pins (sometimes called pegs or nails) or notches to hold the pieces in "square". If you don't have a slate frame, this same process may be used with a modern wingnut style scroll frame.
The second question is "why is it called a slate frame"? The term is probably one coined in Victorian times. The frame when dressed resembles the slate boards which children used for schoolwork. The more historically correct term appears to be embroidery frame or boards.
|
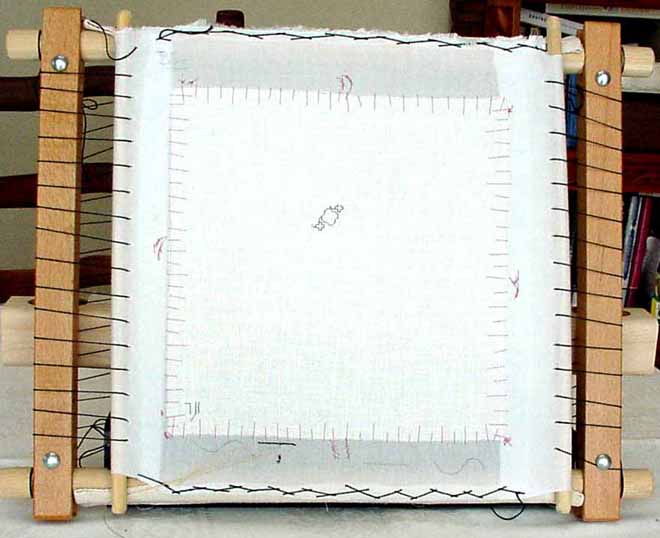
Modern Scroll Frame laced and prepared as a slate frame. Project from a class with Leon Conrad - Precision Blackwork (2001) |
Step 1 Preparation.
If your horizontal boards do not have tightly woven cotton tape already firmly attached you will need to do this. Take a cotton twill tape 1 " wide and staple it along the length of each roller bar. Be sure to leave 2/3s of the tape available for attachment to the ground cloth.
Step 2 Placing the ground cloth on the horizontal bars.
Cut a piece of muslin (called calico in the UK) which is longer by 2" and wider by 2" than the working portion of the boards you are using. Turn under the top by 1". Using a herringbone stitch, attach the muslin to the top board and bottom board's twill tape. Use a heavy thread such as a carpet thread, buttonhole twist or heavy weight linen thread to attach the muslin. To provide greater strength, make the herringbone stitches relatively even in length for both the top and bottom journeys of the stitch. To ensure that the muslin is squared, be sure to place the fabric on the straight grain and work from the center out to each side when stitching.
Option if you need lots of additional strength for the fabric or you are working with only your embroidery fabric, you can sew twill tape to the sides and do your attachment through the twill.
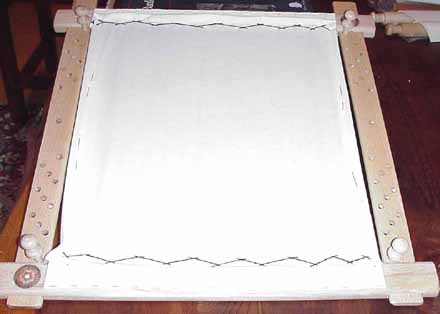 |
Steps 2 & 3 -- notice the herringbone stitches holding the twill to the fabric |
Step 4 Lacing the sides.
Take a very long thread ? about 5-6 times the length of the side you area about to lace. . Use a heavy thread such as a carpet thread, buttonhole twist or heavy weight linen thread for the lacing. Beginning at either the top or the bottom, fold the muslin under 1" and begin to lace. Lacing in this case means ? piercing the muslin (both layers), going up and over the side rail or through the holes if there are any, then piercing the muslin about 1/2" further up (or down) the side, and repeating until you reach the top. Leave a long tail at the bottom and the top of the thread.
Now you are ready to place your embroidery fabric on the frame.
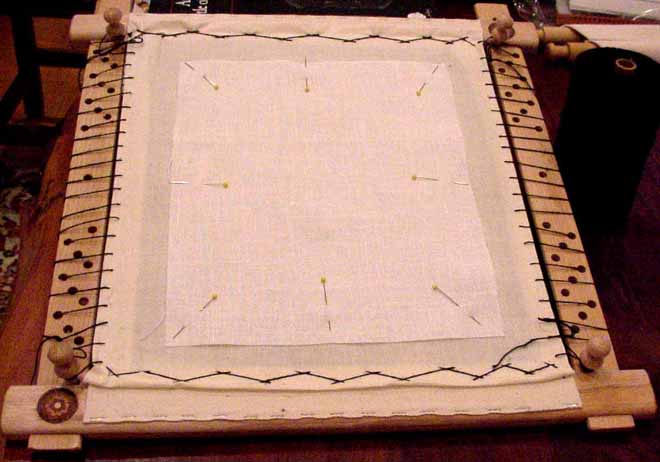 |
Fabric placed and pinned in place in preparation for stitching embroidery to backing fabric. |
Step 6 Attach the fabric to the muslin.
Lay the fabric on the muslin. Carefully pin the fabric in the following order and with the pins perpendicular to the sides of the frame: center top, center bottom, center left, center right, then the 4 corners. If the fabric is a large piece, more pins between these 8 pins may be advisable. Pull a bit tautly before placing each of the pins. Using regular sewing thread, do a backstitch along each side, approximately 1/4" from the edge of the fabric. Begin center top and work around the square.
Step 7 Tightening
Once the sides have lacing strings you can begin to work to tighten the cloth. Firmly anchor the thread at either the top or bottom on one side. A half hitch knot works well. Work your way along the thread to pull it tighter, one hole/rung at a time. Firmly anchor the end. Repeat on the other side. Now working in the opposite direction from the first tightening, repeat the tightening process on each side. You have sufficiently tightened the muslin when it can be considered to be "drum" tight.
Step 8 Working with your dressed frame.
Your frame is now "dressed". You have 2 options for working with the fabric. You can embroider through both layers of cloth or you can trim out the muslin behind the embroidery fabric. Be sure not trim closer than 1/4-1/2" from the backstitch to ensure the tension remains.
You may need to adjust the tension during the working of the project. Fabric stretches over time and the thread may even stretch a little. This is natural and can usually be accomplished with tightening the lacing.
The frame is designed to be laid flat when in use. This can be accomplished in a number of ways. For smaller frames, some of the current table top or floor stands can be used to hold the frame. For larger frames, saw horses or a trestle (table with out the top) can be used. If you don't have a stand, try resting the upper edge on a table and the lower edge on your lap or against your body. In order to get the frame relatively flat, place a pillow in your lap to raise the frame edge. This will permit you to work with both hands, one on top and one under.
Good luck and have fun with your now properly dressed slate frame.
Additional note: since writing this article, it has been brought to my attention that I left out a helpful step. Since most of us don't work straight through a project, there is always the danger of the project acquiring dust or pet fur as it stands idle. To avoid this, at least in part - attach a clean cotton sheet that is larger than the project by about 6" on all sides except the top. Attach to the top webbing with a running stitch. When using the frame, flip the sheet up and out of the way. When not using the frame, flip the sheet down into place and if possible, tuck the edges in under the frame to keep dust and fur out.
Sources for Slate Frames:
Grip It 2 sizes 16" and 22" http://www.gripitplus.com/
Viking Loom various sizes http://www.vikingloom.co.uk/ Slate Frames From BWH Designs
Access Commodities Frames various sizes available through http://www.hedgehoghandworks.com
The Perfect Tool is no longer in business
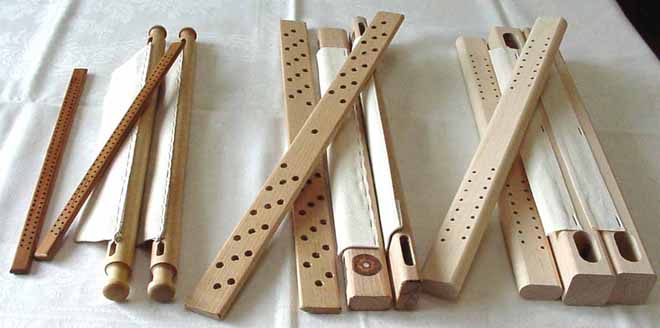
Different Slate Frames: (L-R) The Perfect Tool, Access Commodities, Grip It -- Viking Loom is similar to Access Commodities without the inlay work
Further Reading On Slate Frames:
Leon Conrad in who's class I first laced a frame and saw the difference it can make LC Designs http://www.lcdesigns.co.uk
/Blackwork Embroidery: My Methods and Techniques by Jack Robinson. Published by Flying Machine General Trading Co. 1999. ISBN 0 9537130 0 8
Royal School of Needlework Embroidery Techniques by Sally Saunders, Anne Butcher, and Debra Barrett. Published by B. T. Batsford Ltd., London 1998. ISBN 0 7134 8401 2
Sabrina de la Bere is Guild Patron for the Society for Creative Anachronism West Kingdom Needleworkers Guild. She is fascinated by embroidery history and techniques and takes classes from all sources to learn. While not an expert on any method or technique, she is willing to pass on what she knows at the drop of a needle.
Return to the Main Page for Bayrose.org
All Rights to Pictures and Text Reserved by Robin L. Berry, unless noted otherwise - 2007.
This article and page updated and revised December 2007.