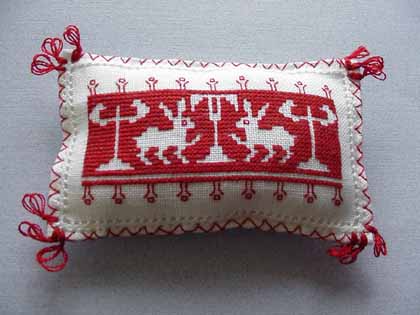
Voided Work Rabbits in the Assisi Style
Pin Cushion finishing instructions included
return to main Voided Work page
Welcome to the wonderful world of Voided Work. Voided Work is any embroidery where the design is left open and unworked and the surrounding area is worked such as to create a "void". Assisi embroidery is one such style of this work. The term Assisi Embroidery comes from the Victorian time when there was a revival of 13th and 14th C embroidery. That which was done in the Assisi area became known as Assisi Embroidery. As part of this movement, several areas of Italy also used specific tassel styles that became common on the work of each area.
You will need evenweave linen 28 count or Aida 14 count for an embroidered front, colored silk (Splendor works well), and needle. While the model was stitched on 36 count, this pattern will transfer to most any size evenweave. 28 count was chosen for its ease of use.
Color: Historically Assisi style embroidery was done in a multitude of colors. Red, green blue and dark gold were frequent choices.
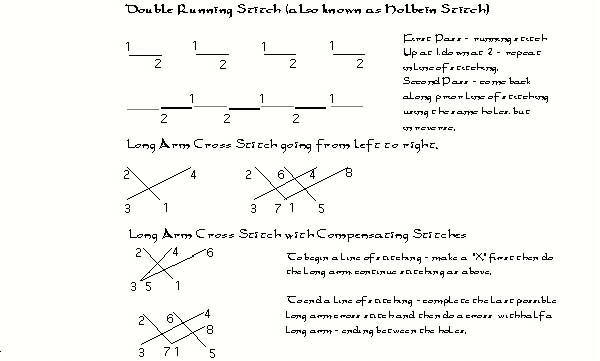
Outlining: During the Victorian Revival it became common to do the initial outlining of the voided areas in black silk. Earlier embroidery shows no outlining, same color outlining, and different colored silk outlining. Stitches for outlining were primarily double running during the 1800's. Earlier embroidery shows both double running and backstitch. USE ONE THREAD of BLACK OR COLORED SILK
Filling Stitches: During the 1800's both cross stitch and long arm cross stitch were used. Historically, the covering stitch could be single running, double running, long arm cross stitch, double sided cross stitch, greek cross stitch, montenegrin, punchwork, french knots, seeding, 4-sided stitch, faggotting, fly stitch, bokkara couching, single and half cross. The objective was to create sufficient contrast to the "unworked" area. USE ONE OR 2 THREADS OF COLORED SILK DEPENDING ON LEVEL OF COVERAGE DESIRED
Decorative Stitching: Both early textiles and Victorian Assisi work have some decoration around the edges. In the 1800's a variety of patterns, usually in double running or backstitch appear. Most are evocative of floral tendrils. Early pieces have edges done in additional voided work, usually in a pattern complimentary to the mail design. Here the edges are done in double running or back stitch in the Victorian style. USE ONE THREAD OF COLORED SILK
Edging: Much of this type of work was done on household linens. Thus much of the work then was finished off with some form of hemstitching. USE ONE THREAD OF WHITE THREAD FOR HEM STITCHING
Finishing: For this piece there is additional finishing offered. See instructions. USE ONE THREAD OF COLOR FOR "X" AND 2 THREADS FOR TASSELS
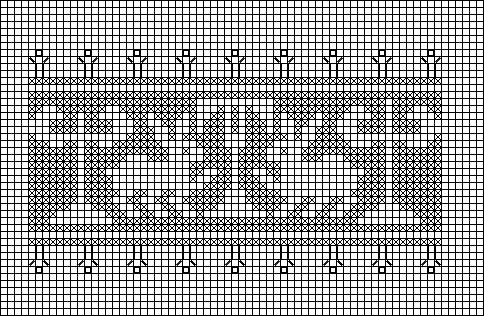
Pattern recharted with corrections for alignment and completeness from Variety, Book No. 4. Instructions rewritten for clarity and completeness. Project originally published by Carmela Testa Co. Inc. Boston Mass.1925. The design comes from the mosaic work in the Duomo of Assisi. Variations of this pattern have been used for Assisi work for the several centuries. See also a variation of this pattern in Ricami d'Assisi 2 (Numero 11, Settembre 1999). Edited by Mani di Fata.
Working Order: EACH SQUARE IS 2 THREADS ON 28 CT OR 1 SQUARE AIDA
(1) Outline: Outline the voided areas in double running stitch. Choose whether this will be in black or the same color as the other background.
(2) Fill: Work the background in long arm cross stitch. Choose whether to work from left to right and back again or just left to right. Choose whether to use compensating stitches or not. Choose whether to use 1 thread or 2 threads for coverage -- 1 thread gives a lighter coverage and 2 is darker and thicker. Use 2 for the Aida.
(3) Decoration: Work the flowery edge bits in double running.
(4) Edging: Count out 8 threads from pattern in all directions and remove the 9th thread. Count out 4 threads more and remove the 5th thread. Do the Italian Hem Stitch over 4 all the way around in thread which matches the fabric.
(5) Finishing:
(a) Trim fabric to 1/2" from Hem Stitching and turn under tack in the corners. Take backing fabric and trim to same size. Pin to front piece, backs together. Using 1 thread of colored silk, work your way around the rectangle doing an overcast through every OTHER outer hole of the Hem Stitching. When you are about 3/4 of the way around stuff it, if you wish to make a pin cushion, then continue the remaining distance. Reverse the process going around to make a "X" on the outer edge.
(b) Tassels. Using 2 threads, make a knot in the end and bury it in the hem. Go around a pencil 2 times, each time going back into the hem. Holding the threads, slip them off the pencil. Make a slip knot at the base of the loops near the hem. Repeat 3 times in each corner.
Finished piece of embroidery is approximately 4 1/4 inches wide by 2 1/2 inches
Italian Hem Stitching diagram - go to Classic Stitches website for details
Return to the Main Page for Bayrose.org
All Rights to Pictures and Text Reserved by Robin L. Berry, unless noted otherwise - 2007.
by Robin Berry 2003.